This wrist wrap technique with cohesive bandage is a quick and easy way of treating a mild wrist sprain. It provides compression and support to protect the injury, while maintaining function in the hand.
All you need to perform this technique is a roll or two of 5cm x 4.5m cohesive bandage. You don’t even need scissors, really, because cohesive bandage is fairly easy to tear by hand. And because cohesive bandage grips to itself very effectively, no knots, adhesive tape or safety pins are required.
Step 1
Circle the hand with the cohesive bandage, just covering the knuckles and passing between the thumb and index finger as pictured:
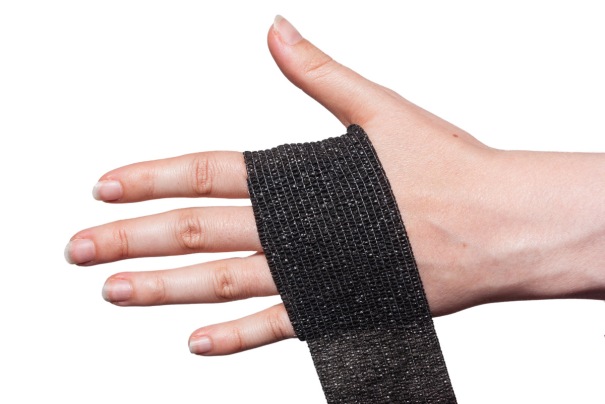
Step 2
Circle the hand again, now moving up towards the wrist:

Step 3
On the third pass around the hand, bring the cohesive bandage around the inside of the wrist, coming up above the thumb like this:

Step 4
Bring the cohesive bandage back across the back of the hand so that it crosses itself:

Step 5
Bring the cohesive bandage back around the palm, and up between the thumb and index finger again. You’ll notice that you’re starting to wrap around the hand and wrist in a figure-of-8 pattern:

Step 6
Come back around the inside of the wrist and repeat the figure-of-8 as described in steps 3-5:

Step 7
After repeating the figure-of-8 three times, stop at the wrist. Then circle just the wrist, twice, to ‘lock’ on the wrap:

Step 8
Cut off the bandage at the wrist and press down the loose end to secure everything:

Notes
Before applying the wrap, ice your wrist to help relieve any swelling – 20 minutes or so with an instant cold pack is a good idea. During the acute phase of the injury, apply ice regularly.
Because the figure-of-8 crosses itself over the back of the hand and wrist, that’s where most of the support is focused with this technique. That makes it great for protecting the wrist in extension. If you want to protect the wrist in flexion (i.e. when it bends the *other* way) try doing the technique in the opposite direction to create a build-up of bandage on the inside of the wrist.
If you feel like you need heavier support you can add more layers of bandage, simply by repeating the figure-of-8 pattern more times. You can also add more compression by wrapping the cohesive bandage on with more tension – but don’t apply it too tightly!
We sell a range of cohesive bandage in our online shop. Click here to take a look.
Physical Sports Limited sells first aid and medical supplies for the treatment of sports injuries. | www.Physical-Sports.co.uk | 01943 662 155

Leave a comment